
Empty Section — build any custom layout with AI or your own code
How to add a blank empty section to your page and use the AI drawer or Code Editor to turn it into any layout you can imagine — no templates, no limits.
In this guide
What is the Empty Section?
The Empty Section is a blank white canvas you add to your page when none of the 21 built-in section types match what you have in mind.
Every built-in section — hero, services, testimonials, FAQ — is a pre-designed template. They are fast and polished, but they come with a fixed layout and content structure. The Empty Section has none of that. It starts as a plain white panel with no layout, no content, and no constraints. You decide exactly what goes inside it.
You build the content two ways: describe what you want to the AI and it builds it for you, or write the HTML and CSS yourself in the Code Editor. Both options give you full creative control — things that would be impossible with any built-in template become straightforward.
Adding an Empty Section to your page
</> button below the type grid)A blank white panel (200px tall) appears in your page preview and the Edit tab opens automatically. The section label shows "Custom Section" until you give it content with a heading.
The Empty Section inserts at the exact position you chose — at the bottom by default, or between two sections if you used the in-between + button.
Option 1 — Describe it to AI and let it build
This is the fastest path and requires no coding knowledge at all.
*"Build a dark section with a large headline on the left and three stat numbers on the right — clients served, years in business, and cities covered"*
*"Create a before-and-after comparison section for a salon — two columns, left shows 'Before', right shows 'After', with a thin divider between them"*
*"Add a full-width banner with a gradient background, a short urgent headline, and a WhatsApp button"*
*"Build a timeline section showing my company history — 2018 founded, 2020 first 100 clients, 2023 expanded to 5 cities"*
The AI reads the description, generates the HTML and CSS from scratch, and applies it to your empty section. The result appears in the preview in seconds.
If the first result is not quite right, keep chatting:
*"Make the background darker"*
*"Change the font to something bolder"*
*"Add a fourth stat — projects delivered"*
Each follow-up message refines the same section without starting over.
Option 2 — Write your own HTML and CSS
If you know HTML and CSS, you have complete control over every pixel.
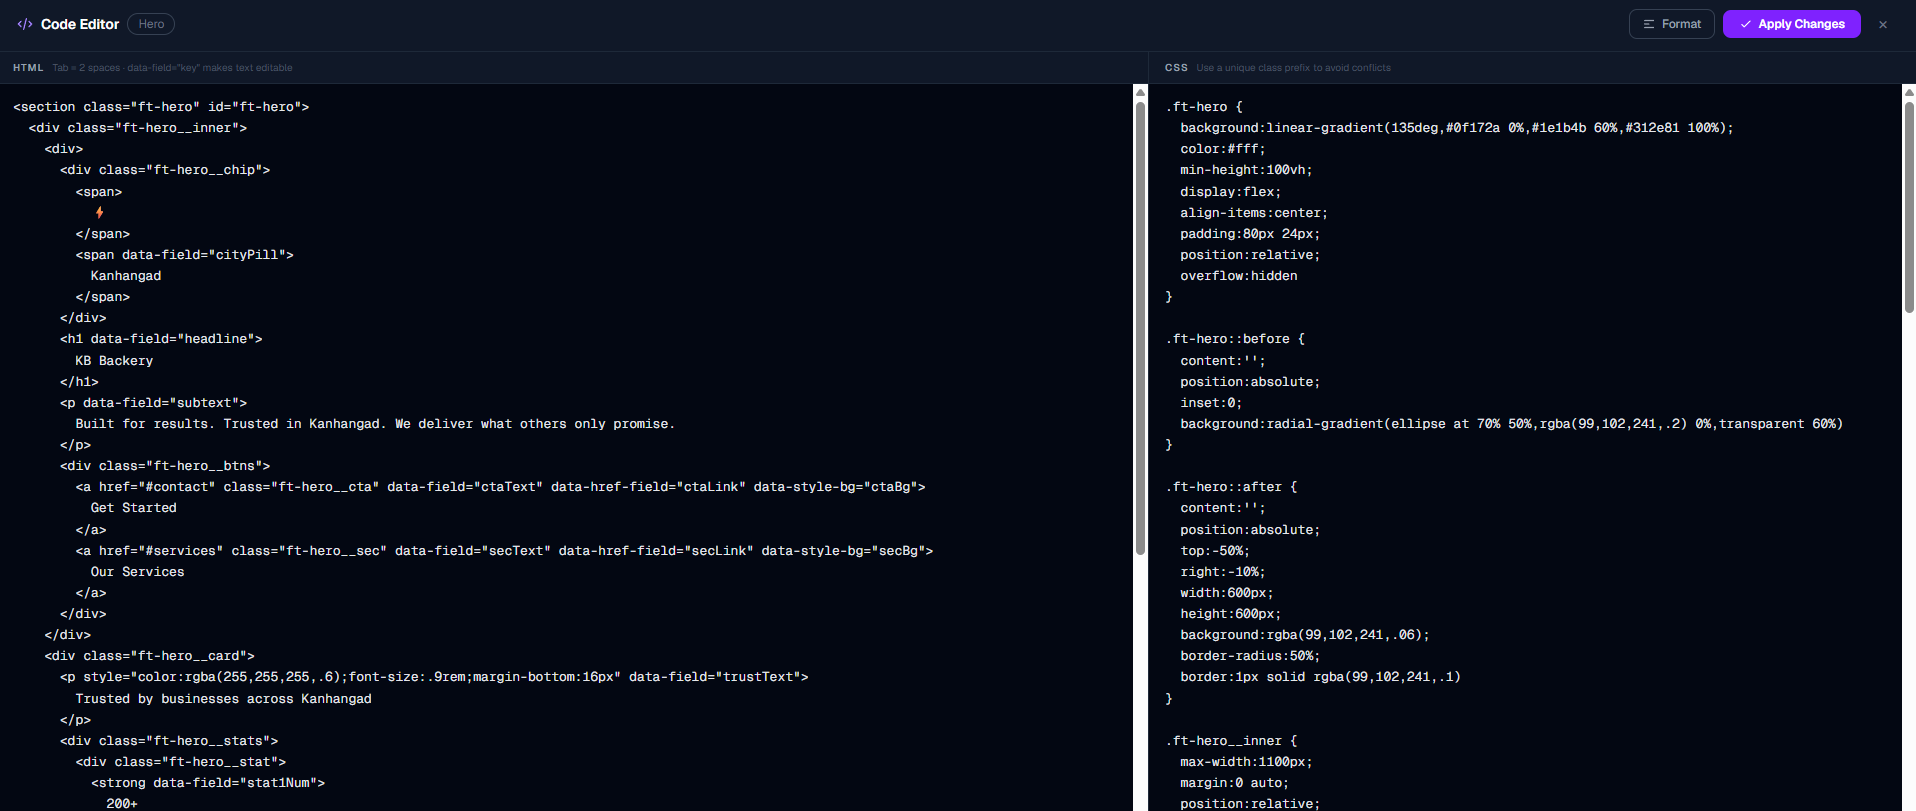
The full-screen Code Editor opens with your section's current HTML on the left and CSS on the right. Both panels are live — changes in either panel instantly update the preview below.
What you can write:
What is not allowed (for security):
When you are done, click Apply and your code replaces the section content. The builder saves it as a draft automatically.
Tip: You can mix both approaches — ask AI to generate a starting point, then open the Code Editor to fine-tune the details exactly the way you want.
Ideas: what people build with Empty Sections
The Empty Section is used for layouts that do not fit any of the standard types. Some real examples:
Custom announcement banners — a slim, colored stripe at the top of the page with a sale message or event date. Standard sections are too tall for this.
Comparison tables — a structured table comparing your service tiers with checkmarks and crosses. Much cleaner than trying to squeeze this into a Features or Pricing section.
Quote or pull-quote sections — a single large testimonial or mission statement in a bold typographic layout, centred on the page.
Process steps — a horizontal or vertical numbered flow diagram ("1 → Book → 2 → Consult → 3 → Done") with custom spacing and icons.
Award and certification badges — a row of logos or certification marks for industry memberships, press features, or award badges.
Map + details block — a two-column section with contact details on the left and an embedded map iframe on the right (yes, iframes from trusted map providers are allowed in the published output).
Portfolio grid — a custom masonry or asymmetric photo grid that goes beyond the standard Gallery layout.
Video embed — a centered YouTube or Vimeo embed with a title above and a caption below, in a clean container.
Bio card — a founder profile with a large circular photo, name, title, short story, and social links — all in one elegant custom layout.
Custom footer strip — a secondary footer above the main footer, perhaps with links to your latest blog posts or a newsletter signup.
None of these require professional coding skills when you use the AI path — you just describe what you want.
Making fields editable after building
After the AI (or your own code) builds the section, you may want to make specific text or images editable from the Edit tab — so you can update them later without reopening the Code Editor.
The Edit tab only shows fields that are tagged with special data attributes in the HTML. The AI adds these automatically when it generates sections, but if you wrote the HTML yourself you will need to add them manually.
The four attributes:
data-field="key" — makes an element's text content editable. Example: <h2 data-field="headline">Our Story</h2> → "Headline" field appears in the Edit tab.
data-image="key" — makes an image src editable. Example: <img data-image="photo" src="..."> → "Photo" image upload appears in the Edit tab.
data-href-field="key" — makes a link URL editable. Example: <a data-href-field="ctaLink" href="#">Book Now</a> → "Cta Link" URL field appears.
data-bg-color="key" — makes a background color editable. Example: <div data-bg-color="bgColor" style="background:#6366f1"> → "Bg Color" color picker appears.
You do not need to tag everything — only the fields you actually want to edit regularly. Decorative elements can stay fixed in the HTML.
Empty Section vs Section Creator — which to use?
Both features let you write custom HTML and CSS. They serve different purposes:
Empty Section (this feature) — for building a custom layout on one specific page. The section lives on that page only. Great for one-off layouts, experiments, and page-specific designs. Available to all paid plans inside the builder.
Section Creator (Dashboard feature) — for building a custom section you want to reuse across multiple websites you own. You design it once, save it to your account, and it appears in the Add Section picker for every site you build. Available on Basic plan and above.
A common workflow: build your custom layout using the Empty Section on your live page. Once you are happy with how it looks, save the page, then copy the HTML and CSS into the Section Creator — now the same design is permanently available for all your future projects.
More in Builder
Builder layout and the top bar
Understand the full builder layout — the three panels, every top-bar button, the save system, and how to navigate pages.
Managing sections — add, reorder, duplicate, delete
Everything about sections: what they are, how to add them in the right position, reorder by dragging, duplicate, delete, and change their visual style.
Editing content — the Edit tab
How to edit text, buttons, links, colors, images, icons, and every other field in the content editor.
The AI Build & Edit drawer
How the AI chat works — generating new sections, redesigning existing ones, choosing models, using reference images, and understanding AI credits.
Media library, logo, fonts, and hero images
How to upload images and logos to the media library, set your site logo, choose fonts, and set a hero background image or video.
Power features — select mode, batch redesign, templates, shortcuts
Advanced builder techniques: select multiple sections for batch AI redesign, save custom section templates, use keyboard shortcuts, and apply full-site templates.
Managing pages in your website
How to add new pages, switch between pages, navigate internal links, and delete pages you no longer need.
Using templates smartly — get more with fewer AI credits
How to build a complete, professional website using ready-made templates without spending any AI credits — then use AI only where it matters most.
Section Creator — build and save custom HTML/CSS sections
How to write your own HTML and CSS in the Section Creator, add editable fields with data attributes, run the AI security check, and reuse your sections across all your websites.
Section Creator — coding rules & what JavaScript is allowed
Understand exactly what HTML, CSS, and JavaScript you can use in the Section Creator — including how to write interactive components like menus, accordions, and animations correctly.
Creating new pages with AI — the complete guide
How to use the AI assistant to create full pages with sections and automatic nav wiring — including model choice, credit costs, and what to expect.
AI Assistant tips and tricks — get better results faster
Practical techniques for getting the most from the AI assistant — quick prompts, the right mode for the right job, how to save credits, and what the AI can actually do.
Save as My Template — reuse sections across all pages
How to save any section as a personal template and reuse it on any page or any website — the fastest way to keep your site consistent.